Recently, my UniFi Dream Wall (UDW) reported that storage was not healthy. Under Settings > System > Storage, it said:
“Drive failure detected” and “Storage not healthy” with an exclamation mark icon 
Here’s how I recovered a seemingly failed SD card in my UniFi Dream Wall without replacing it.
I had previously upgraded the internal SD card from the stock 512 GB to this SanDisk Extreme 2TB microSD card (or .de here), so I was surprised. It turns out the SD wasn’t broken, just filesystem was corrupted, likely due to a power outage or sudden reboot.
Symptoms
- UniFi Protect stopped recording
- Storage panel shows errors or degraded health
- File I/O errors in logs
- SSH access shows the SD card exists (
lsblk), but is read-only or unusable fsckrefuses to run because the filesystem is in use
Root Cause
Linux filesystems like ext4 can get corrupted by unclean shutdowns. Especially with large-capacity SD cards (1–2 TB) and continuous write actions like the Unifi Protect which is constantly writing the recordings to the card, this may result in:
- orphaned or multiply-claimed blocks
- journal errors
- missing or unreadable files (e.g.
.ubvfrom UniFi Protect)
Step-by-Step Recovery
- SSH into the Dream Wall (if you don’t know how to do this, ask ChatGPT or look at the forums. You need a program called Putty, enable SSH access at the Dream Wall and login with username: root and the correct password).
- Identify the SD Card, type:
lsblk
Mine looked like this:
sdq 1.9TYou’re interested in
├─sdq1 4M
└─sdq2 1.9T /sdcard1/dev/sdq2. - Stop Unifi Services
- Stop the Unifi Protect (and if possible Unifi Network and other services, however, you might be connected via VPN) via the GUI
- Type the following to also stop these:sudo systemctl stop ms
sudo systemctl stop msr

sudo systemctl stop msp

sudo systemctl stop mst
- Unmount the SD Card
umount /sdcard1 - Repair the Filesystem
If the SD is cleanly unmounted, run a fast but full repair:
sudo fsck -f -y -v /dev/sdq2
(forces repair and automatically answers ‘yes’ to all prompts)In my case, I saw:
root@My-Dreamwall:~# sudo fsck -cfv /dev/sdq2

fsck from util-linux 2.36.1-dirty

e2fsck 1.46.2 (28-Feb-2021)

Checking for bad blocks (read-only test): ^C0.08% done, 2:00 elapsed. (2/0/0 errors)
/dev/sdq2: Updating bad block inode./dev/sdq2: ***** FILE SYSTEM WAS MODIFIED *****
root@My-Dreamwall:~# sudo fsck -y -f /dev/sdq2
fsck from util-linux 2.36.1-dirty
e2fsck 1.46.2 (28-Feb-2021)
Pass 1: Checking inodes, blocks, and sizesRunning additional passes to resolve blocks claimed by more than one inode…
Pass 1B: Rescanning for multiply-claimed blocks
Multiply-claimed block(s) in inode 92799604: 56602 125860
Pass 1C: Scanning directories for inodes with multiply-claimed blocks
Pass 1D: Reconciling multiply-claimed blocks
(There are 1 inodes containing multiply-claimed blocks.)File /.srv/unifi-protect/video/2025/06/01/D021F993B06E_0_rotating_1748775448400.ubv (inode #92799604, mod time Sun Jun 1 13:25:56 2025)
has 2 multiply-claimed block(s), shared with 1 file(s):
(inode #1, mod time Fri Jul 4 22:52:03 2025)
Clone multiply-claimed blocks? yes - Do you want to recover any repaired files?
Then temporarily mount the SD card:
sudo mount /dev/sdq2 /mnt/temporary1
Then check the lost+found directory and the specific repaired files/folders:
ls -lah /mnt/temporary1/lost+found

ls -lah "/mnt/temporary1/.srv/unifi-protect/video/2025/06/01/"
You can safely remove the corrupt .ubv file(s):
sudo rm "/mnt/temporary1/.srv/unifi-protect/video/2025/06/01/D021F993B06E_0_rotating_1748775448400.ubv"Now, unmount the temporary mount again:
sudo umount /mnt/temporary17. Reboot the Dream Wall
This will mount the SD card again and start all applications and processes.
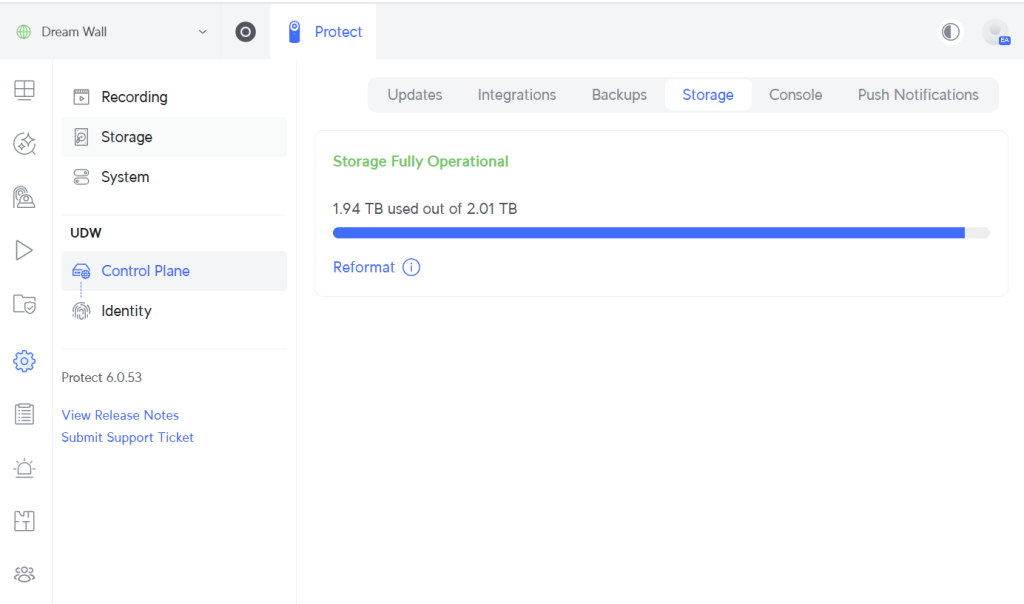
Check the storage and you will see something like this:
Leave A Comment