 Rack PDU")
After seeing similar cases online, I decided to dive in and was able to fix it purely through software, without replacing hardware.
Step 1 – Initial Inspection
I first disassembled the unit (spoiler: this is not necessary for the fix) thinking there might be a burnt relay, blown surge protector, or loose cable. Everything looked fine. However, I did discover a soldered CR2032 battery, which surprised me. It’s not socketed and would be a pain to replace later. If it dies, it might reset internal settings after a power outage… something to watch out for.
UPDATE (4th november 2025): I also saw two 47μF 400V capacitors, one was a little bulky.
The device was giving errors: “Internal power supply #1 fault” and “Internal power supply #2 fault“. I replaced one capacitor. Turned it on and the fuse in my house blew, after that, the other capacitor was also a bit bulky :) So I replaced that one too (part: Panasonic EEUEE2G470, Ø16x25mm). Then the unit worked again and I had to do the below steps again.
Step 2 – Factory Reset
To start clean, first reset the unit:
-
Hold the reset pin (while the unit is powered on) for ~10 seconds.
-
When the status LED blinks rapidly, release the button.
-
Wait ~1 second, then press it again briefly.
-
The LED will turn orange, wait ~20 seconds.
-
The unit resets to factory defaults:
-
Username:
apc -
Password:
apc
-
Step 3 – Serial Connection
Use a serial cable (e.g. RJ12 APC 940-0144A + USB-to-Serial converter, or this all-in-one USB->RJ12 cable from amazon.com, or here on amazon.nl or amazon.de).
I recommend using Tera Term on Windows (also available for other OS), which supports XMODEM uploads needed later.
Step 4 – The Problem
In the Device Manager menu, I saw only 9 outlets.
After upgrading to the latest firmware, I saw no outlets at all.
Clearly, something deeper was wrong, likely a misconfigured internal model/board setup.
Step 5 – Uploading Old Firmware with Backdoor Access
-
Download this firmware (also found at https://www.se.com/us/en/download/document/APC_RPDU_393_EN/), extract it and in it you’ll find an old v2.0.2 firmware named apc_hw02_aos_202.bin (versions below v3.5 include access to a hidden factory menu!).
-
Open System → Tools → Upload a File → Via Serial (XMODEM).
-
Select option 4 (38400 baud) when prompted.
-
In Tera Term, go to
Setup → Serial Portand set baudrate to38400.
-
Use
File → Transfer → XMODEM → Send...to upload theapc_hw02_aos_202.binfirmware.")
Wait for the upload to finish (it takes a few minutes, just like in the old days).
Step 6 – Factory Menu Access
After upload:
-
Switch Tera Term back to 9600 baud.
-
Wait up to 5 minutes for the firmware to boot.
-
If nothing happens, insert a pin into the reset hole briefly (1 sec).
Now log in with:
-
Username: any text (really — anything works)
-
Password:
TENmanUFactOryPOWER
You’re now in the factory menu !
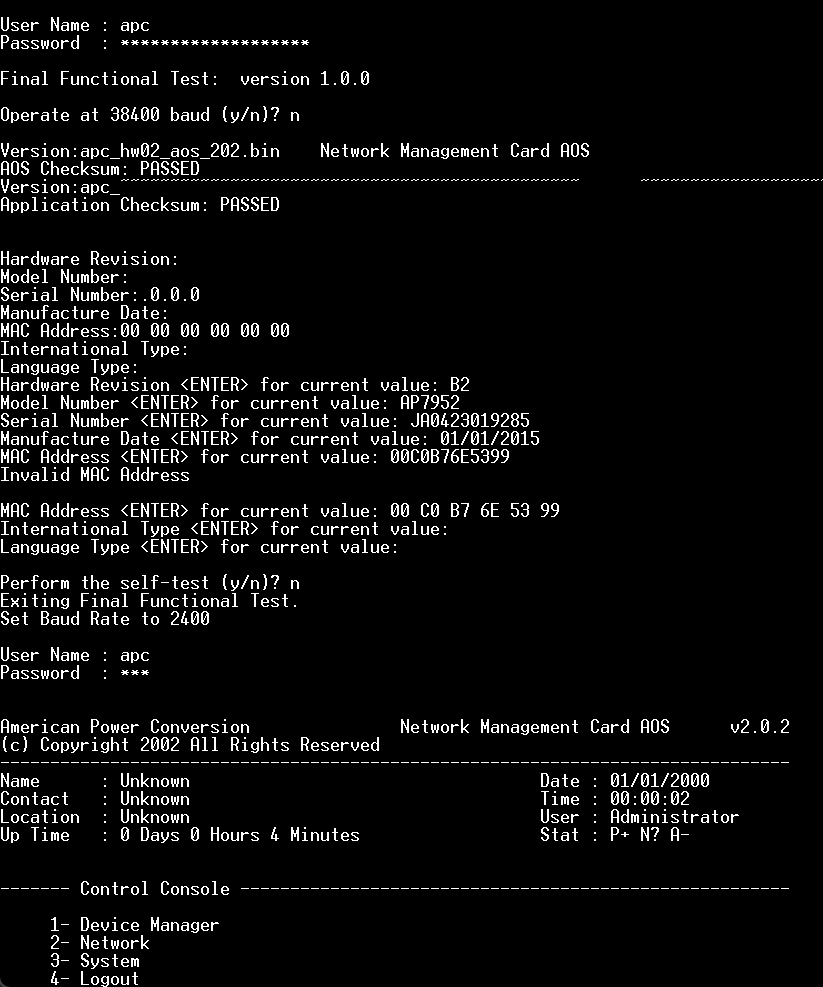
When prompted, enter:
- Hardware Revision:
B2(for AP7952 and many other products, you can safely put B2) - Model Number:
AP7952(or what’s printed on your unit) - Serial Number: e.g.
JA0423019285(from label on the backside) - Manufacture Date:
01/01/2015(this always worked for me) - MAC Address:
00 C0 B7 6E 53 99(from label on the backside or any other that you want, spaces required) - International/Language Type: just press ENTER
- Self-test: choose
n(No) - Finally: set Baud Rate to 2400
Switch Tera Term’s baudrate to 2400 as well.
Step 7 – Reinstall Latest Firmware (AOS and RPDU)
-
Power cycle the device.
-
Switch Tera Term to 9600 baud.
-
Log in as
apc/apc. -
Go to System → Tools → Upload a File → Serial (XMODEM).
-
Upload the latest v3.9.4 firmware, found in the extracted folder: apc_hw02_aos_394.bin
-
Wait for it to finish (again, up to 5 mins).
-
Now, upload the latest RPDU firmware: apc_hw02_rpdu_393.bin, also found in that folder, via the same menu using XMODEM.
Again: do not reboot too quickly — wait for full internal flashing to complete (up to 5 minutes!)
Step 8 – Done!
After rebooting, you should see:
- All 24 outlets restored (or any other number when using another model)
- Web access functional again
- Network settings configurable
- Outlets individually controllable again
This is a great example of how older enterprise hardware can often be restored with the right tools — and some persistence. No soldering, no parts replaced, just serial access, firmware juggling, and patience.
Let me know if this helped or if you have questions!
The old FTP server http://ftp.apcc.com was destroyed, so I can’t find the firmware
files for AP9605 board. I’m sure you have them. If so, please send them to me.
I’d be very grateful.
Files etagent.bin and etloader.bin (old listing
https://www.mmnt.net/db/0/0/ftp.apcc.com/apc/public/hardware/snmpcard/firmware )
Thanks.
@Martin, Did you replace the two 47μF 400V caps?
UPDATE (4th november 2025): I also saw two 47μF 400V capacitors, one was a little bulky.
The device was giving errors: “Internal power supply #1 fault” and “Internal power supply #2 fault“. I replaced one capacitor. Turned it on and the fuse in my house blew, after that, the other capacitor was also a bit bulky :) So I replaced that one too (part: Panasonic EEUEE2G470, Ø16x25mm). Then the unit worked again and I had to do the below steps again.
Unfortunately, when APC PDU does not see its outlets or forgets the MAC address, it is the result of some hardware problem. We have about 30 these PDUs with Manufacture Date 200x, and about 6 are already dead, all the same way – it starts randomly switching off outlets, forgot IP address, forgot MAC address. I was able to repair it temporarily using the procedure described above, but only temporarily. There is some bad component prone to failure. Only if we reveal the component, we could probably return those dead PDUs to service.
Thanks, it really works! Except, after the old v2.0.2 firmware boot, it communicates over the console only 2400 baud (step 6). Until I found it, I thought that the PDU is ultimately dead.
1. Did you use TerraTerm?
2. Did you also do the factory reset first?
3. Do you switch to 38400 baud rate before sending? (AFTER the unit says you need to switch baudrate)
I can’t upload the old firmware. Not sure how you did it, when I try to send it using xmodm I get ACK timeout. Did you restarted the pdu in a special mode before uploading the firmware?
Did you try the exact same prodecure as I did? Log in with that special password and use TerraTerm ?
Hi, thanks for the article, I’m hoping I can save my pdu as well. My PDU does not accept any files to be sent over xmodem. Do I have to put the pdu in some mode to accept that file?